

Clinical Highlights this Month
- Learner and Member Search
- New Subdomains for Grouping Programs and Reports
- Enhanced Administrative Control for Note Signatures
- Information Added to Note Data Exports
- Set Names are now Included in Data Exports
- Author’s Job Title Available in Note Templates
- Deeper Clinical Insights
- Smaller Things
PM Highlights this Month
- Denial Code–to–Denied Amount Mapping
- Authorization-Driven Bulk Transfer of Billed Appointments
- Date-Driven Provider LOA Tracking with Scheduler Enforcement
- Payment Posting Progress Indicators for EDI Payment Posting
- Service-Level Control for Supervision Hours Calculation
- Per-Session Billing Units with No Duration Dependency
Guides
Learner and Member Search
Find the right people, faster. Locating learners and members is now easier than ever with our new search tool, found directly in the Find menu. To ensure data privacy and compliance, search results are tailored to your specific permissions:
- With full permissions: Search across learner profile fields.
- With restricted permissions: Search is limited to aliases only. This ensures that sensitive information (PHI) remains protected.
New Subdomains for Grouping Programs and Reports
You can now tag programs, as well as group reports, using the 5 new domains below.
- Communication > Pragmatic
- Parent/Caregiver Goals > Caregiver Education and Participation Goals
- Daily Living > Self Help
- Foundational Learning > Foundational Play
- Executive Functioning >Theory of Mind
Enhanced Administrative Control for Note Signatures
Managing "stuck" notes just got easier. If a staff member moves on before a note is completed, authorized users can now remove that staff member’s signature to allow for updates or finalization.
- Granular Control: A new permission has been added, allowing administrators to decide exactly who can perform this action.
- Total Security: Like all our note-based permissions, this gives you full control over your organization's documentation integrity.
Information Added to Note Data Exports
Note Data exports now contain even more information about the notes. The date and time that approvals and statements were made, and the note author’s job title, are included in the exports. We've also included timestamps for everyone who made a statement or approval on the note.
All timestamps in our exports now reflect the timezone of the person exporting the data. This helps keep all the data in a consistent timezone especially when staff members collected data in a different timezone.
Set Names are now Included in Data Exports
Program and target names have always been a part of our data exports, but the set information was not. Set names are now included in the Target Outcomes (per session), All Measures, and All Opportunities/Trials exports.
Author’s Job Title Available in Note Templates
The note author’s job title is a field in the member profile that can now be included in note templates. You can find it in the note template editor under Imported Fields… > Note Fields… > Author’s Job Title.
Deeper Insights in Data Collection
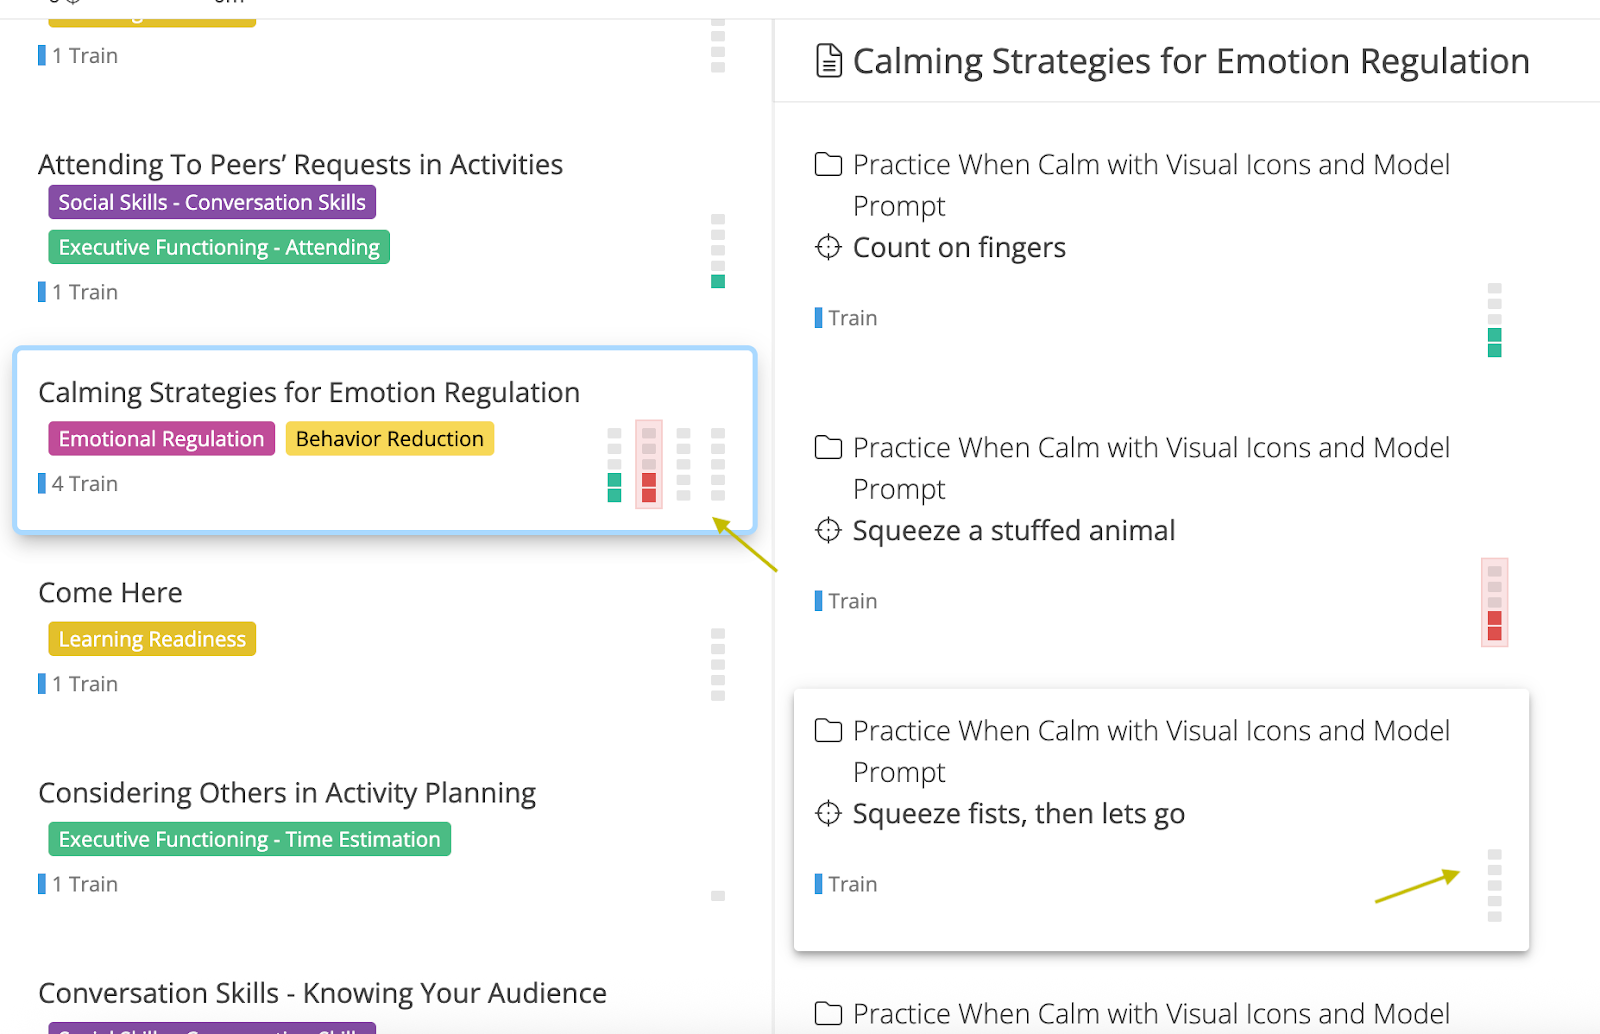
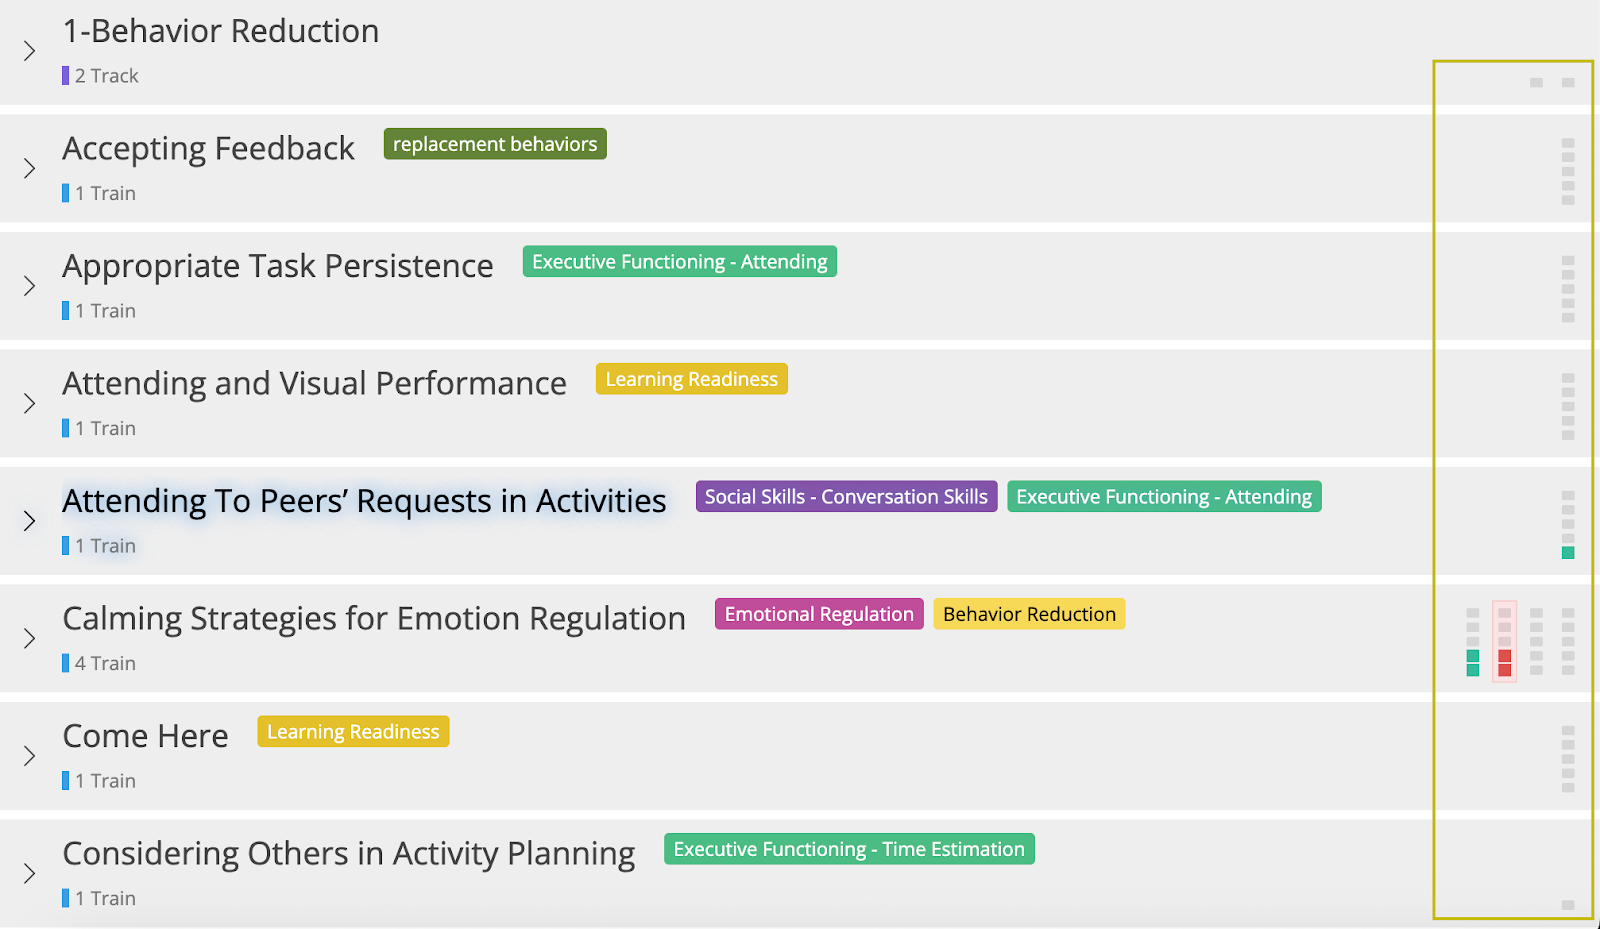
Trial progress is now visible on all program and target cards
Mini-squares showing the suggested trials are now displayed at all times and in all three views. Users can turn off the mini-squares by using the “View” menu. Data collectors can now see what the suggested trials are at any point during the session with added flexibility to control their views.
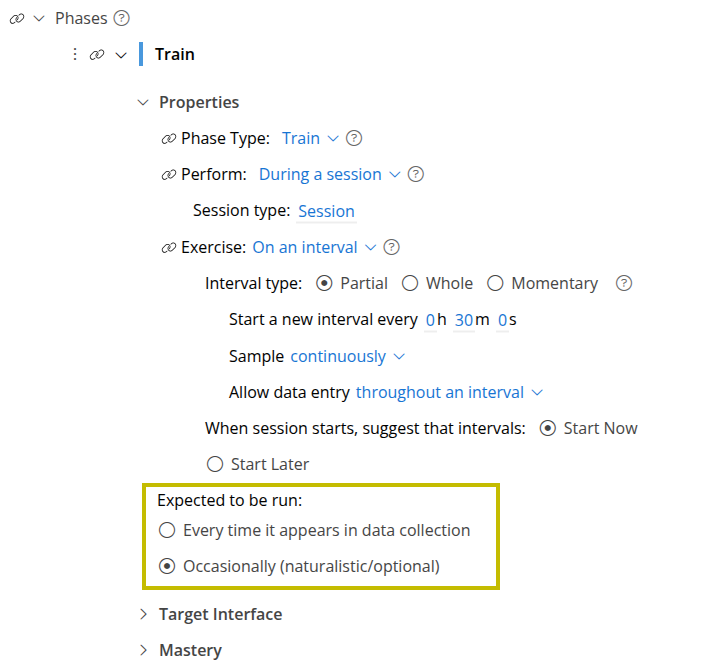
New Phase Setting to Specify When a Target is Expected to be Run
A new option is now available in phase settings called Expected to be run. The options include:
- Every time it appears in data collection
- Occasionally (naturalistic/optional)
Existing and new phases will default to Every time it appears in data collection allowing clinicians to specify the intention for when a target should be run. This setting will also ensure future clinical metrics and data collection features are more accurate.
How Suggested Trials Are Calculated Based On Multiple Rules
When multiple rules are used for session outcome (including basic mode), the largest value of all the minimum rules is used to determine the suggested trials. The suggested trial squares will now match the basic mode session outcome rule.
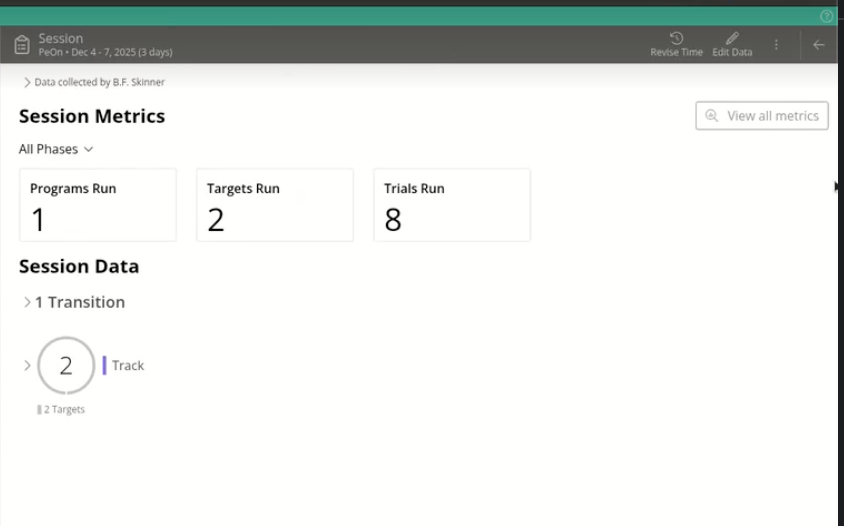
Metrics For Each Session Displayed In Session Summary
Sessions in a learner's timeline now show useful metrics about the session. The metrics include total number of programs, targets, and trials run in the session, as well as the rate of programs, targets, and trials run per hour. These metrics can be filtered by phase type providing a measure of the density of skill acquisition or behavior opportunities that were provided in that session.
Smaller Things
- Cloning a note now also clones the chart time ranges.
- The +Note option is no longer visible in the UI for users that don’t have permission to create notes.
- The Revise Time button is now called Revise Note Time. Same behavior, but now with a more descriptive name.
- Motivity’s login screen got a glow-up! A fresh new look was added.
- Inviting members to your organization has a much clearer and more usable workflow. Same behavior, but now with a clearer user interface.
- Motivity’s internal learner and member IDs, previously only visible in reports, can now be seen in the respective profiles.
- The Timeline and Reports section of the learner curriculum now has a quick way to remove all filters after filtering.
Denial Code–to–Denied Amount Mapping
Motivity now enables precise mapping of denial codes to their corresponding denied dollar amounts at the service-line level during both EDI (835) payment posting and manual payment posting.
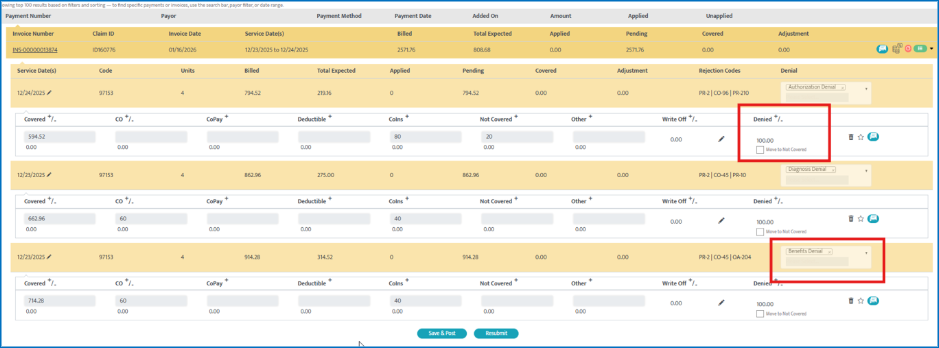
This enhancement brings greater transparency into denial management by clearly identifying how much revenue is impacted by each individual denial reason. This will help by, eliminating guesswork during reconciliation and appeals.
Key Enhancements:
- Dedicated “Denied” amount column at the invoice-line level
- Automatic denial mapping from EDI 835 (per code, per amount)
- Structured manual denial entry with validation
Persistent denial details across:
- Collections
- Denials
- Resubmissions
- Secondary billing
- New invoice status: “Denied Partially”
- Expanded AR & billing reports with denied amount visibility
Where You’ll See This Update:
- Collections → EDI Payment Posting
- Collections → Manual Payment Posting
- Collections → Denials
- Invoice Timeline
- Billing & Collection Reports
- Secondary Billing (EDI 837)
How To Use This Feature
How to View Denial Code–to–Amount Mapping (ERA / 835 Posting):
- Navigate to Collections > ERA Posting
- Open an ERA
- Select the invoice for review OR expand the service line details
- Under the Denials section, you will now see:
- Denial code(s)
- Corresponding denied amount for each code
- Review the mapped values before posting the payment
- Note: If multiple denial codes exist on a single service line, each code will display its own denied amount.
How to Post Denial Amounts During Manual Payment Posting:
- Navigate to Collections > Manual Payment Posting
- Select the invoice and service line being posted
- Add one or more denial codes as applicable
- Enter the denied amount for each denial code
- Save and complete payment posting
- Note: Each denial code is now individually tied to its denied dollar value.
How This Appears in Denials & Reporting:
- Denial workflows will reflect denied amounts by denial code
- Reports will show:
- Total denied amount
- Denied amount per denial reason
- Appeals teams can prioritize denials based on financial impact
Move to Not Covered (When Applicable):
- Denied amounts can optionally be moved to Not Covered
- When moved:
- Denied amount becomes 0
- Not Covered amount increases
- Mapping is preserved for downstream reference
- This action is synchronized between:
- Invoice view
- EDI popup
Resubmission & Secondary Billing Behavior
Resubmissions:
- Denial mappings are retained with the original invoice
Resubmitted invoices:
- Start with Denied = 0
- Maintain historical denial traceability
Secondary Billing (EDI 837)
- Saved denial codes and amounts are automatically included as:
- CAS segments under the relevant SVD
- Ensures secondary payers receive accurate denial context
Reporting Enhancements
New “Denied” columns are added to:
- AR Billing Report
- AR Date-of-Service Billing Report
- Resubmitted Invoices Report
What’s included:
- Total denied amount per invoice or service line
- Includes denials even if later moved to Not Covered
- Supports comparison between:
- Original invoice
- Resubmitted invoice
Invoice Status Updates
- Denied → when fully denied
- Denied Partially → when a payment includes denied amounts
- Status automatically updates based on posting, reconciliation, and adjustments
Authorization-Driven Bulk Transfer of Billed Appointments
Motivity now supports bulk transfer of appointments when an authorization changes, including billed appointments, without requiring invoice voiding. This enhancement allows billing teams to correct authorization changes efficiently, while preserving claim and payment integrity — even after billing has occurred.
Key Enhancements
- New “Transfer Type” dropdown added to Appointment Transfer
- Support for:
- Unbilled appointment transfers (existing behavior)
- Billed appointment transfers within the same payer
- No invoice voiding required
- Claim-level integrity enforcement for billed appointments
- Partial success handling with clear failure reasons
- New Collections alert: Claims Require Action – Auth Change

Where You’ll See This
- Admin -> Appointment Transfer
- Collections Module
How To Use This Feature
How to Transfer Appointments When Authorization Changes
- Navigate to Appointment Transfer
- Before selecting dates, choose a value from the new Transfer Type dropdown:
- Transfer Type Options
- Transfer Unbilled Appointments (Default) → Works exactly as it does today
- Transfer Billed Appointments to Same Payer
Transfer Type: Unbilled Appointments (Default)
- System behavior remains unchanged
- Displays only unbilled appointments
- Existing transfer flow continues as-is
Transfer Type: Billed Appointments to Same Payer
- Select Transfer Billed Appointments to Same Payer
- The system displays:
- Only billed appointments tied to the selected authorization
- Appointment Status column shows “Billed”
- Date filter defaults to:
- Authorization Start Date
- Authorization End Date (You may modify the date range as needed)
- Only billed appointments within the selected date range are shown
- Click Transfer
- The Authorization List will show:
- Only authorizations linked to the same payer
- Select the new authorization
- Review the confirmation popup and proceed
Watch a Video of Appointment Transfer of Billed Appointments
Validation Rules — Claim Integrity
To protect claim accuracy, Motivity enforces claim-level transfer rules for billed appointments. Smallest Transferable Unit = Claim
- If an appointment is part of a claim, all appointments in that claim must be selected
- Partial claim transfers are not allowed
Example (Blocked Transfer)
- Claim INS-1054 contains appointments A1, A2, A3
- User selects A1 and A2 only
- Result:
- No appointments are transferred
- All three appointments appear in Unsuccessful Transfers
- Reason shown:
- All appointments from claim not selected.
Partial Success Handling
If multiple appointments are selected and some fail validation. the transfer result will show:
- Successful transfers
- Failed rows with clear failure reasons
- Failed appointments remain unchanged
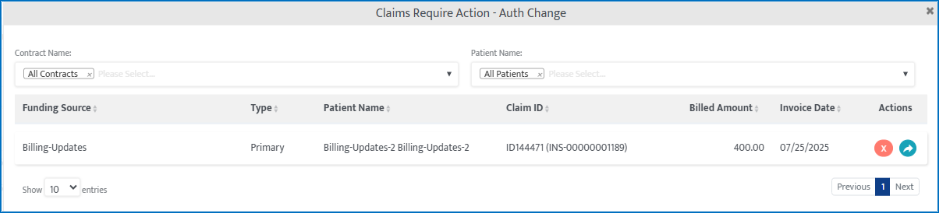
Collections: New Alert — Claims Require Action – Auth Change
A new billing alert helps teams quickly identify claims impacted by authorization changes.
Claims Require Action – Auth Change (Tile)
- Appears in Collections when access is enabled and displays:
- Count of impacted claims
- Total billed amount (Example: 4 claims | $1,000 total billed)

Date-Driven Provider LOA Tracking with Scheduler Enforcement
Motivity now supports date-driven Leave of Absence (LOA) tracking for providers, with direct enforcement in the Scheduler, alerts, reporting, and audit timelines. Instead of a static “On LOA” flag, organizations can now define LOA start and end dates, ensuring providers cannot be scheduled, edited, or render services during their LOA period.
Key Enhancements
- Replaced static On LOA checkbox with date-based LOA periods
- Support for multiple LOA periods per provider (non-overlapping)
- Automatic scheduler enforcement during LOA dates
- Recurring appointments skip LOA dates
- New Scheduler alert subtype: Provider is on LOA
- Full audit trail & timeline tracking for LOA changes
- New LOA Details report under Provider Reports
Where You’ll See This
- Provider Module → Basic Info → Work Information
- Scheduler (all views)
- Scheduler Alerts
- Reports →Provider
How To Use This Feature
How to Add a Provider LOA Period
- Go to Providers → Provider Profile
- Navigate to Basic Info → Work Information
- Locate the LOA section
- Click Add
- Enter:
- Start Date
- End Date
- Save
- The LOA period is now active and enforced across scheduling.
Validation Rules for LOA Periods
- LOA periods cannot overlap
- If an overlapping date range is entered (while adding or editing), the system displays: “Overlapping period for LOA is not allowed.”
- Multiple historical and future LOA periods can be maintained for the same provider
Editing or Deleting an LOA Period
- Use Edit to update LOA dates
- Use Delete to remove an LOA period
- Each action is recorded in the Provider Timeline

Scheduler Behavior & Enforcement
When a provider has an active LOA period: Restricted Scheduler Actions. The following actions are blocked if they fall within the LOA date range:
- Scheduling new appointments
- Editing existing appointments
- Rendering appointments
- Un-canceling appointments
- Rescheduling appointments
- Starting appointments
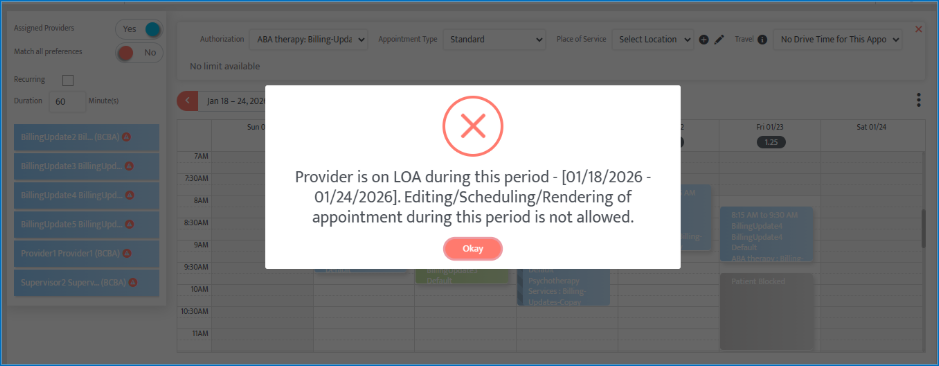
Scheduler Error Message
If a restricted action is attempted, users will see “Provider is on LOA during this period – [LOA Start Date to End Date]. Editing, Scheduling, or Rendering of appointments during this period is not allowed.”
Recurring Appointments & LOA
When creating recurring appointments:
- Dates overlapping with the LOA period are automatically skipped
- Valid dates before and after the LOA period continue to be scheduled
- No manual cleanup is required
Scheduler Alerts – Provider on LOA
New Alert Subtype
- Module: Scheduler Alerts → Appointment Conflict
- Subtype: Provider is on LOA
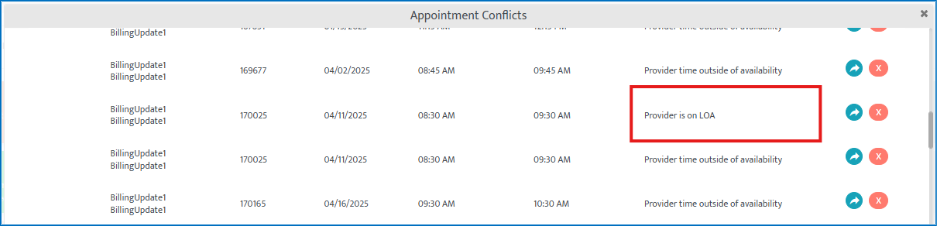
Alert Trigger Conditions
- A new LOA period is added and
- One or more appointments exist within the LOA date range
Alert Lifecycle
- Alert is created for affected appointments
- Alert is removed automatically when:
- The appointment is canceled or deleted, or
- The LOA period is edited so the appointment no longer overlaps, or
- The LOA period is deleted
Reporting: LOA Details Report
There is a new report available named LOA Details, located in Provider Reports.
Columns Included
- Provider ID
- Provider Name
- On LOA (Yes/No)
- LOA Start Date
- LOA End Date
Filters Available
- Provider Name
- LOA Status (Yes / No)
- Date Range (LOA Start & End)
Access Control & Permissions
New granular permissions are available under Provider Details:
- Add LOA
- Edit LOA
- Delete LOA
Only users with appropriate access can manage LOA periods.
Retrospective Data Handling
For providers already marked as On LOA before this release:
- LOA Start and End Dates remain blank
- No scheduler restrictions apply
- Scheduler enforcement begins only after dates are added
Payment Posting Progress Indicators for EDI Payment Postings
Motivity now provides line-level visual indicators for EDI (835) payment posting, giving users clear, real-time visibility into which individual payment lines are still processing and which have completed. This enhancement removes ambiguity during high-volume posting scenarios and makes EDI processing status transparent, traceable, and easier to validate.
Key Enhancements
- Real-time progress indicator at each payment line
- Visual confirmation when posting is completed
- Reduced reliance on a single cumulative progress indicator
- Improved clarity when multiple EDI payments are processed simultaneously
Where You’ll See This
- Collections Module
- EDI (835) Posting view
- Individual payment line rows
How This Works
During EDI Posting (In Progress State), when an EDI posting is initiated:
- A small circular progress indicator appears directly on the payment line that is being processed
- Each line updates independently and in real time
Users can immediately identify:
- Which payment lines are still processing
- Which lines are waiting vs actively posting
This replaces the need to infer status from a single global indicator.
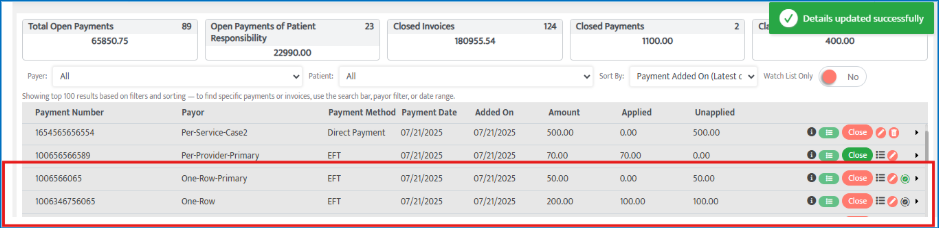
After Posting Completes (Completed State), once posting for a payment line is successful the progress circle transitions into a Completed state icon (e.g., a green checkmark inside the circle). The completed icon:
- Remains persistently visible
- Acts as a clear visual confirmation that the line has finished posting
Clearing the Completion Indicator
- The completion icon remains visible until the user interacts with that payment line, such as:
- Clicking the EDI icon
- Opening or editing the payment
- Closing the line details
- After any user action on that line, the completion indicator disappears
This ensures confirmation is visible when needed, without permanently cluttering the interface.
Global Progress Indicator Update
- The existing top-right cumulative progress indicator is no longer available for posting status
- Line-level indicators now provide the primary source of truth
Service-Level Control for Supervision Hours Calculation
Motivity now introduces service-level control over supervision hours tracking, allowing organizations to explicitly define which services should be included in supervision percentage calculations and reports.
With this enhancement, supervision hours are no longer calculated across all overlapping appointments by default. Instead, only services that are explicitly marked for supervision tracking are considered — improving accuracy, flexibility, and compliance.
Key Enhancements
- New “Include in Supervision” toggle at the service level
- Two-tier supervision filtering:
- Provider role eligibility
- Service eligibility
- More accurate supervision percentages
- Automatic exclusion of non-relevant services (e.g., assessments, indirect work)
- No UI changes to existing reports — logic updated behind the scenes
Where You’ll See This
- Admin Module → Service Inventory
- Supervision Tracking Summary Report
- Supervision Tracking Detail Report
How To Use This Feature
How to Configure Services for Supervision Tracking
- Navigate to Admin → Service Inventory
- Add a new service or edit an existing one
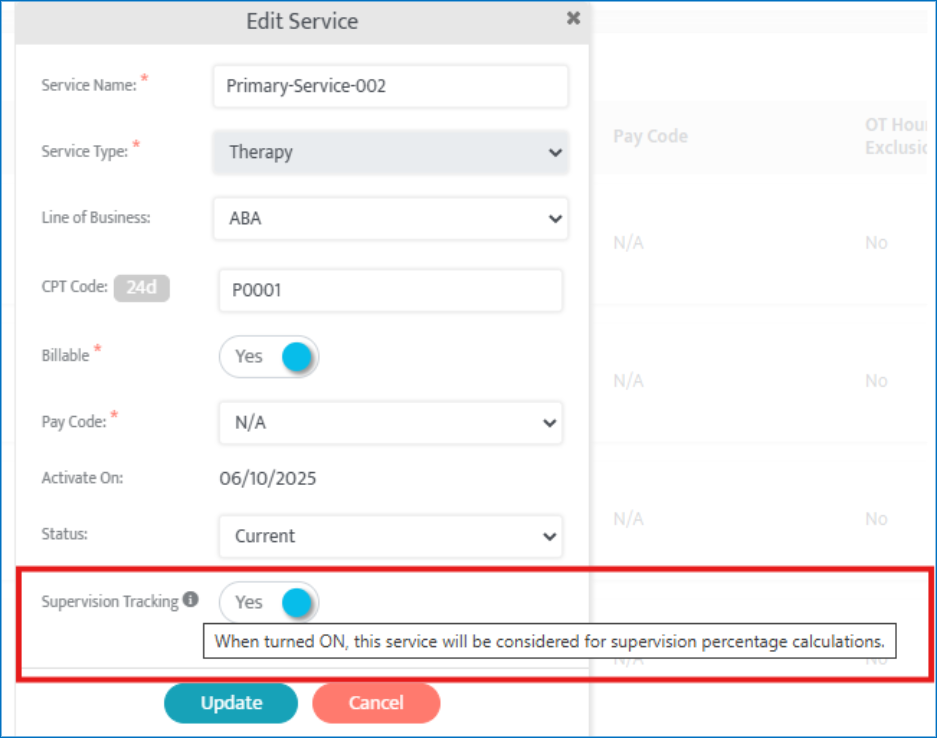
- In the Add / Edit Service pop-up, locate the new toggle: “Include in Supervision”
- Set the toggle:
- ON → Service is included in supervision calculations
- OFF → Service is excluded from supervision calculations
- Save the service
For newly created services, this toggle is ON by default.
How Supervision Hours Are Now Calculated
Supervision hours are included only when all conditions below are met:
✅ Overlapping Appointments
- It will only start when we have overlapping appointments
✅ Role-Based Conditions
- One appointment is linked to a role which requires supervision
- One appointment is linked to a role which provides supervision
- Role definitions continue to be governed by:
- Admin → Roles
✅ Service-Based Conditions
- Both appointments must use services where “Include in Supervision” = ON
If any of these conditions fail, the overlapping appointments are excluded from:
- Supervision percentage calculations
- Supervision detail reports
Backward Compatibility & Existing Data
- All existing services retain their current supervision toggle state which is “ON”
- No historical data is altered automatically
- Organizations can update services incrementally without disruption
Per-Session Billing Units (Session-Based Authorizations)
This enhancement enables true per-session authorization support in Motivity. This allows services to be billed by session count instead of duration. Each appointment now consumes one unit, regardless of how long the session lasts.
Many payers and care models bill like a medical visit—per session, not per hour. Previously, Motivity tied session billing to hourly logic, limiting flexibility. This update aligns the system with real-world session-based billing models.
Authorization Setup:
- Hour-based limits disabled when Billing Unit = Per Session
- Unit limits enforced directly (Daily, Weekly, Monthly, Total)
Scheduler Enforcement:
- 1 appointment = 1 unit
- Clear alerts when session limits are exceeded
Recurring Appointments:
- Validated against authorization limits (not hours)
Visibility & Tracking:
- Authorization usage shown in units and percentages in the scheduler
Reporting & Utilization:
- Per-session authorizations excluded from hour-based utilization and fulfillment reports
EDI Payment Posting Guide
Quick Steps to Reconcile Claims
* Types of Corrections Can Be Made
How to Resubmit a Claim from the Collections Page
- Expand the invoice.
- Make the required corrections for resubmission.
- Click “Save & Post” then "Proceed" (to save the EOB data).
- Re-expand the invoice and click Resubmit.
- Claim Status: RESUBMITTED